Just when the ground freezes and you finally have him out of the mud, your horse steps on something hidden beneath the snow. Maybe he has an abscess, heel bulb laceration, or puncture. Your vet says, “Keep it clean and dry,” as though she doesn’t know what a Herculean task this can be. Not only is the foot a notoriously difficult place to wrap correctly – or to perform stitches, if they’re necessary – but even the best wraps are prone to falling off. Not to mention, an incorrectly wrapped foot can cause a bigger problem than the injury itself!
If you’re at your wits’ end after returning to the barn every morning to find an unravelled wrap, these tips might help.
Talk to Your Vet
If you’re on the fence about a foot injury, and especially a heel bulb injury, call the vet. Lacerations to the digital arteries located in the heel can very dangerous, and it’s difficult even for experienced horse people to assess the level of damage because wounds to this area can be much more serious than they originally appear. Wounds near the foot also have a high propensity for contamination and infection.
Your horse may require sutures or even a cast to minimize healing time and allow for the best results. Depending on how long the wound has been open, your vet may have to clip, thoroughly clean, and debride the wound before stitching or wrapping, and your horse may be prescribed antibiotics, NSAIDs, and tetanus prophylaxis.
Remember to ask questions and even take notes while your vet is wrapping – if you’re unable to be there for the vet visit, ask your handler to speak to the vet for you.
How to Make a Disposable Boot
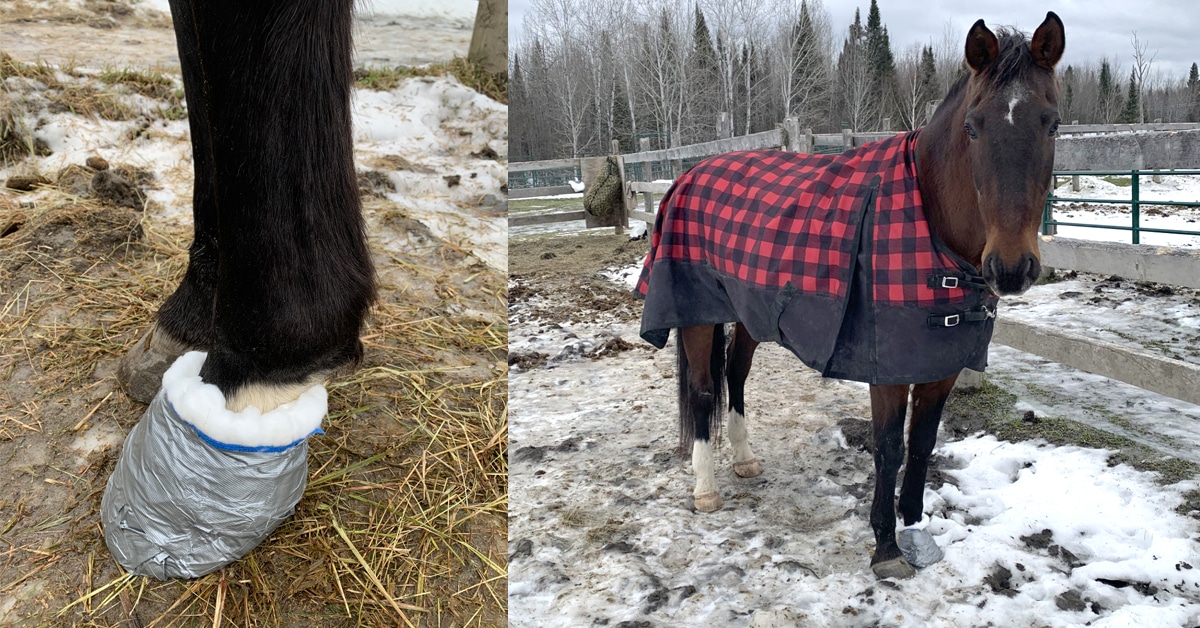
So the vet has prescribed wrapping and stall rest and/or minimal turnout while the wound closes. If you’re very lucky, a medical horse boot will adequately cover the correct areas of the foot without irritating the injury. Sometimes a soft bell-boot or a soft trailering boot can be useful, but typically something with more flexibility, padding, and coverage is required.
A steadfast solution is the disposable boot. Rather than trying to tackle the coronary band or the heel bulbs alone, the entire foot can be wrapped, including the underside of the hoof. You can also customize your disposable boot to best accommodate the kind of injury you’re dealing with.
In this order, you will need:
1. A duct-tape sheet; several duct-tape strips, 3-4 inches
2. A pair of scissors
3. A non-stick sterile gauze pad large enough to completely cover the wound
4. Stretchy cotton gauze
5. Padding (diaper, cotton sheets)
6. Vet wrap
7. Cotton cloth tape (like Elastikon)
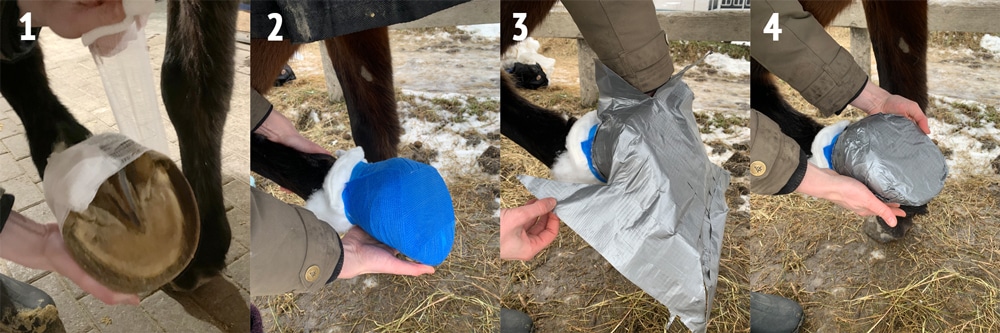
1. After applying a sterile gauze pad to the wound, hold it in place with elastic gauze
2. Cover the entire hoof with vet wrap using a figure-eight pattern
3. Apply the duct-tape square to the bottom of the hoof after cutting slits in the corners
4. Smooth the edges of the duct-tape to conform to the foot
(Charlie Fiset photos)
Before beginning, make a duct-tape square, approximately ten by ten inches, by placing a layer of overlapping horizontal strips and then placing a second layer of vertical strips overtop. Stick it to the barn wall so you can come back to it later.
- Start with a clean, dry hoof and foot. If your horse has an abscess, the foot may need to be soaked and dried before wrapping.
- Apply any ointment or other medicine your vet has prescribed, such as a honey bandage, to a piece of sterile non-stick gauze, and then place the gauze so it’s completely covering the wound. It’s important for the gauze to be sterile because it’s the only part of the wound dressing that comes into direct contact with the wound.
- Use the roll of stretchy cotton gauze around the hoof to hold the sterile pad in place. Avoid pulling tightly; the gauze is only used to stop the sterile pad from moving under the wraps.
- Select your padding depending on the kind of wound you’re dealing with. Options include sheet cotton cut into squares large enough to fold up and around the hoof from the bottom, or baby diapers. The idea is to find something absorbent that will also cushion and protect the wound. You might require a more absorbent option for an abscess (the diaper) or a more mouldable option for a laceration (cotton padding).
- If using a diaper, place the foot inside so that the tabs can be fastened at the heel bulbs. If covering a heel bulb-laceration, the diaper should be large enough to reach about halfway up the pastern. If using cotton padding, place the pad under the hoof and fold up.
- Affix the padding by applying the vet wrap in a figure-eight pattern around the foot until you’ve covered the padding almost completely, leaving an inch or so at the top so the vet wrap does not rub on skin or hair. Try your best to make the wrapping even and uniform. The wraps should never be tight, but you can make them more secure around the hard tissue of the hoof. When you’re finished, you should be able to fit a finger under the edge.
- Now it’s time for the duct-tape square. The square can be cut diagonally from each corner to allow for easier folding, or you can mould the duct tape around the hoof. The duct-tape only serves as a protective covering of the bandages, and should never be pulled tight or placed in direct contact with the hair or skin above the bandage.
- Once the duct-tape sole is applied, take the extra duct-tape strips to cover any edges or smooth any corners around the hoof. If you notice your horse is rubbing through the layers, you can add another.
- To prevent debris from entering through the top of the bandage, wrap a layer of cotton elastic cloth tape around the exposed padding at the top of the wrap.
- If sending your horse out for minimal turnout, take a cheese grater and gently rasp the bottom of the foot to prevent slipping.
- Don’t forget that all wraps are typically changed every 24 hours, and must be checked periodically to ensure they haven’t become soiled or are causing discomfort.
Now, with a little luck, your horse’s wound will be kept clean and dry until the next day!